PBX server and Media Gateway arrived

Today the PBX server as well as the Media Gateway arrived.

DELL PowerEdge R310 (PBX server)

  • Intel Xeon X3440 (4C, 2.53GHz, 8MB cache, HT)
  • 4GB DDR3 1333MHz RAM (2x2GB)
  • RAID 1 with PERC H200A
  • 2x 250GB SATA

PATTON SN4638/5BIS/EUI (Media Gateway)

  • 5 BRI S0 ports
  • 8 channels
  • ../EUI = external power supply (notice: ../UI = internal power supply)

Leave a comment

Firewall-Server arrived

Today the firewall server arrived. In the near future it is going to run pfSense to provide the services of three WANs to our internal network:

HP ProLiant DL360 G4

  • 2x Intel Xeon 3.0 GHz (64 bit)
  • 2 GB RAM
  • 2x 36 GB Ultra 320 SCSI Hot Swap HDDs
  • RAID-Controller HP Smart Array 6i with 64 MB cache
  • 2x LAN 10/100/1000 Mbit (onboard)
  • 2x LAN 10/100/1000 Mbit (via HP NC7170 [PCI-X])
  • 2 redundant power supplies
  • 2x PCI-X slots

The setup will happen on next weekend. For those who are interested in pfSense and want to go beyond the tutorials on pfsense.org with a good book, I can recommend “pfSense 2 Cookbook” by Matt Williamson.

Leave a comment

First parts arrived

Today the first parts of the new PBX arrived:

To be continued tomorrow, hopefully 🙂

Leave a comment

The value of a prototype

After Google announced to give away a predecessor (called “CR-48”) for the coming generation of notebooks with ChromeOS for free in December 2010, we could sense a significant amount of excitement even here in Germany. But that stopped suddenly when it turned out that this prototype would only be available in the USA (Google speaks about a charge of around 60.000 devices).

After Google IO went down this year those notebooks loaded with ChromeOS are now officially called “Chromebooks” and should be available in Germany starting next week.

But what if a Chromebook “CR-48” was going to appear here on eBay.de? Continue reading

Posted in Allgemein | Leave a comment

Hello World! (again)

I have taken the chance to exchange my static blog for this one with WordPress and I am starting right now to convert all old articles to this new platform. This blogpost is very important to me because it poses as a “separator” between the previous (static) blogposts and the new ones under WordPress.

One big change (starting right here) is the two-language-support and I am going to make heavy use of this feature. That is why I am announcing that all future blogposts are going to be published in German and in English.

I cannot wait to see if this new system is going to increase my posting-frequency 😉

Posted in Allgemein | Leave a comment

Geiger-Mueller counter in Germany on eBay

Nach der furchtbaren Katastrophe von Fukushima Daiichi vom 11. März treibt vor allem der Diskurs in Deutschland teils seltsame Früchte.

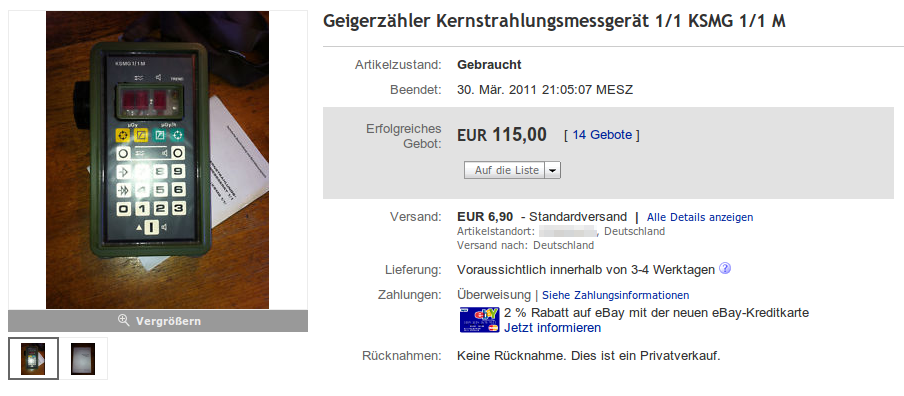
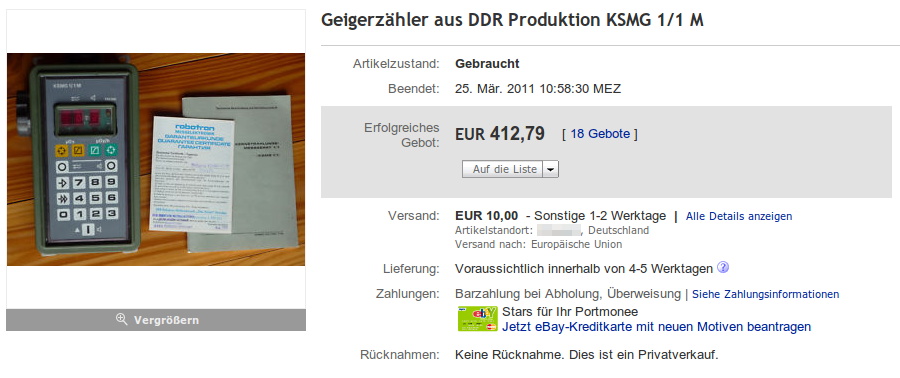
Wer die Nachrichten verfolgt, kann lesen, dass Geigerzähler hier in Deutschland (!) momentan Mangelware sind. Originell ist auch, dass alte (aber natürlich immer noch gute) Geräte aus DDR-Beständen mittlerweile im Wert steigen (!). Dies kann recht gut auf eBay betrachtet werden.

Dazu zwei Beispiele:

Auktion vom 25.03.

Auktion vom 30.03.


Ich muss dazu sagen, dass sich laut Beschreibung beide Geräte in identischem Zustand befanden. Noch letztes Jahr (2010) waren Geräte dieses Typs über eBay für unter 100 EUR zu haben.

Das verleitet natürlich zu der Frage: was wollen die Käufer hier in Deutschland mit diesen Geräten? Die heimische Nebelkammer untersuchen?

Wenn auch nur ein Körnchen Wahrheit in den hysterischen Berichten verängstigter deutscher Einwohner steckt, glauben hier wirklich einige mittels Geigerzähler erhöhte Werte messen zu können – dabei bezweifle ich, dass die meisten Käufer die Messwerte dieser Geräte überhaupt annähernd korrekt interpretieren können (und da schließe ich mich mit ein, obwohl ich keinen gekauft habe).

Posted in Allgemein | Leave a comment

Issues with the resolution of Dell IN2010N / IN2010NB

The following problems occured with two monitors from different shipments of the type “Dell IN2010N / IN2010NB”: after a cold start of the PC into Windows (no matter if Vista / 7) the correct resolution (1600×900) was selected, but the whole picture was moved leftwards and stripes were displayed. By manually turning off and on the monitor the problem disappeared – for the session. However this cannot be a good solution.

I do not seem to be the only one with this issue:

For me the advice of installing an inf-file (the monitor’s definition file) has not shown any effect. My solution looks like this:

  1. Download MultiRes and install it
  2. Start “cmd” and find out the 8-character alias of “Program Files” resp. “Program Files (x86)” by executing “dir /on /x” in the root directory (on my side: “PROGRA~2”).
  3. Start → All Programs → right click on “Startup Programs” → “Open”
  4. Copy “multires.bat” into the new open window. The file does not (!) need administrator rights.

Hints:

  • taskkill.exe is a part of Windows XP/Vista/7
  • “ping -n 4” .. creats a 4-second break (there is no sleep-command in Windows!)
  • “start” .. starts a program in the background and continues processing the batch-file
  • “taskkill” because multires.exe stays active after starting it and we need to close it to start it again with different parameters 🙁
  • where applicable the waittime should be adjusted, because we cannot set the order of the startup programs in Windows
  • max. resolution of the Dell IN2010N/IN2010NB is 1600×900 (16:9)

As always: comments are welcome.

Posted in Allgemein | Leave a comment

Vodafone Mobile Connect USB-Stick (ZTE K3565-Z) unter Windows 2000 einsetzen

Nachdem ich letztens einen alten Rechner (Jahrgang 2002) wieder flott gemacht hatte, stellte sich für den Einsatz am Bestimmungsort die Frage nach dem Internetzugang. DSL? Fehlanzeige. 56k Modem? Gähn. UMTS-Stick? Gekauft.

Aber Moment mal: ich habe für den Rechner nur eine Windows 2000 Lizenz. Und von Windows 2000 steht auf der Verpackung von besagtem “Vodafone Mobile Connect USB-Stick” nichts. Und tatsächlich: die Software im Datenteil des UMTS-Sticks lässt sich nicht vollständig installieren und bricht mit einem Fehler ab.

Nach kurzer Recherche stellt sich raus, dass der Stick eigentlich “ZTE K3565-Z” heißt. Im Folgenden nun meine Anleitung, um den Stick auch unter Windows 2000 zur Mitarbeit zu überreden:

  1. Treiberpaket herunterladen und entpacken
    Download: K3565-Z Softwarepaket
    Herunterladen und entpacken. In den nächsten Schritten wird auf den Inhalt des Verzeichnisses, in das das Softwarepaket entpackt wurde, Bezug genommen.
  2. Längst überfällig: Windows-Setupdateien in WINNT-Verzeichnis verlagern
    “C:WINNTSetup” anlegen
    Verzeichnis “I386” von W2K-CD in “C:WINNTSetup” kopieren
    “regedit” öffnen
    Schlüssel “HKLMSOFTWAREMicrosoftWindowsCurrentVersionSetup” aufrufen
    Eintrag “ServicePackSourcePath” auf “C:WINNTSetup” setzen
    Eintrag “SourcePath” auf “C:WINNTSetup” setzen
  3. Treiber installieren
    Verzeichnis “ZTEZTE Vodafone K3565-Z Driver” (aus Softwarepaket) öffnen
    xcopy *.inf C:WINNTinf
    xcopy *.cat C:WINNTinfcatalog
    xcopy *.sys C:WINNTSetup
  4. Stick Erstinbetriebnahme
    Stick anstecken und auf CD-Laufwerk warten (Beschriftung: “9.4.9”)
    Im Arbeitsplatz Rechtsklick auf Laufwerk → “Auswerfen”
    Laufwerk verschwindet, Treiberinstallation beginnt (ohne Rückfrage, nur “Neue Hardware gefunden” Fenster!)
    Nach Abschluss Stick wieder entfernen
  5. Autoruns abschalten
    AutoRunSettings.exe (aus Softwarepaket) benutzen und nach Screenshot konfigurieren.
  6. USBDLM installieren und konfigurieren
    USBDLM.zip (aus Softwarepaket) nach “C:Programme” entpacken
    Dateien (aus Softwarepaket) “ejectdisk.exe”, “USBDLM.ini”, “wkill.bat”, “wkill.exe”, “wkill_attach.bat”, “wkill_detach.bat” nach “C:ProgrammeUSBDLM” kopieren
    “_install.cmd” in “C:ProgrammeUSBDLM” aufrufen
  7. MWconn installieren
    MWconn.exe (aus Softwarepaket) starten, Anweisungen folgen, Installation beginnt
    CONFIG.exe wird geöffnet,
    Reiter “Global”: Standardeinstellung wählen (z.B. “Deutschland Vodafone Websessions”), Haken bei “Onlinezeit” setzen, “Beenden nach Rückfrage” wählen
    Reiter “Gerät”: Gerätetyp “8 ZTE”
    Verbindung: “Verbindung automatisch” → “bei Programmstart aufbauen” und “bei Programmende beenden” Hakens setzen, Verbindungsart “automatisch”
    “OK” klicken und Rückfrage nach Anlegen einer neuen DFÜ-Verbindung bestätigen
  8. Verbindung aufbauen
    Aus Startmenü Eintrag “MWconn” → “UMTSGPRS.EXE” starten.

In Schritt 6 wird ein einigermaßen hässlicher Hack erforderlich: beim künstlichen An- und Abmelden des UMTS-Sticks erscheint ein Fenster von Windows, das über diesen Vorgang informiert, aber nicht ohne Nutzereingriff verschwindet. Damit der Vorgang fortgesetzt werden kann, muss das Fenster automatisiert geschlossen werden, wofür “wkill.exe” verantwortlich ist.

Ich wünsche allen mit ähnlichen Problemen viel Erfolg mit dieser Anleitung. Kommentare sind willkommen.

Posted in Allgemein | Leave a comment